The quilt was inspired by “stencil quilts” made by Daniel Rouse. He made a t-rex and a deer quilt. He says, "The quilt is one in a series of “stencil quilts” that I have designed and created. The technique involves creating two patchwork quilt tops, sewing the layers together along the lines of a stencil, then cutting out the top layer to reveal the stencil beneath. I was inspired by an antique quilt whose well worn top began to disintegrate, revealing and even older and more worn quilt inside that had been used as batting or stuffing."
This post contains affiliate links. As an Amazon Associate I earn from qualifying purchases.
If you're new here, hello! I'm Laura! I design quilt patterns, and I'm a self-proclaimed deal hunter! Be sure to join the popular Quilting & Sewing Deals Facebook group where I post sales, deals, and coupon codes from all around the web!
I have wanted to try the reverse appliqué stencil quilt for a very long time, and thought this was the perfect way to experiment.
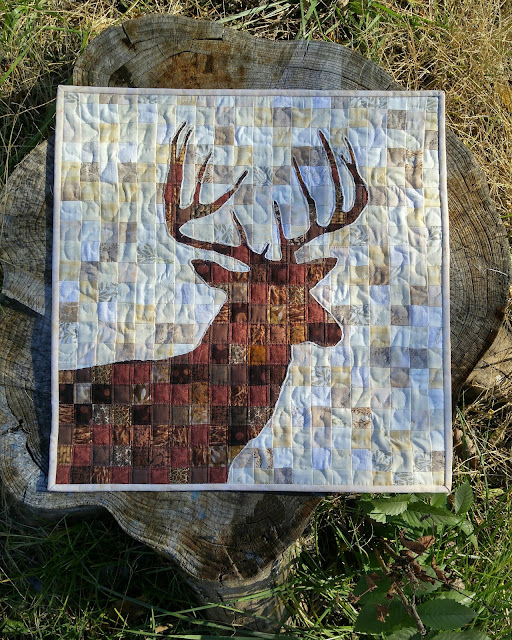
I chose all light tan/neutral fabrics out of my stash and also all dark brown fabrics. I cut them into 1 ½” squares (that would finish at 1”).
I put all the light squares in one brown paper sack, and the dark browns in another. I sewed the light squares together randomly until I had a 20”x20” quilt top. Then repeated for the dark brown. (400 squares of each!)
I found a picture of a deer silhouette that I liked on the internet and printed it on 4 pages so it would be large enough to cover the quilt.
I layered the backing (fabric I got in a scrap bag from Carol’s Country Quilt Shop in Van Buren, Missouri - now closed), batting, and dark quilt top and pin basted them together. I used my walking foot on my Bernina Record 930 and quilted on either side of the seam lines. Then I pin basted the light quilt top and the paper deer silhouette on top. Using my darning foot, I quilted around the outline of the deer. Then I removed the paper outside that outline and quilted a stipple pattern onto the light quilt top. Then I removed the rest of the paper and cut away the quilt top that was inside the outline stitches.
I used a light batik fabric from my stash for the binding. The quilt is 20" square.
I mailed it along with some extras to Kentucky!
This just might be my favorite quilt I've made to date!
__________
If you liked this post, you may also like these:


Thank you so much for sharing your beautiful quilt! I have been looking for ideas for a charity quilt for teen boys ... this is it ... though (because of time restrictions) I would have to make the squares larger. ZTHANKS!
ReplyDeleteThat is sooo beautiful. A hunter I know is about to have a baby boy, his first. He wants a BABY quilt made of camo ....I googled DEER Quilt and found this ...sooo beautiful but being a newbie the instructions are clear as mud to me Lol. I get sewing the squares (oh, I've done exactly one piece of applique to date....last week, I finally got the courage to attempt only that! Now I see this beauty!) Are there books or what exactly is the technique I would search to attempt to learn here? reverse stencil applique? I found stencil applique, but nothing to do with having two tops?? Please help. I envy this piece of art. Thank you
ReplyDeleteThank you, Tammie! I did use a technique of reverse applique to make this quilt. I don't know of any books on this exact method, but I tried to share about my process in the blog post. Please share a photo of your quilt if you decide to try it! I'd love to see it! Happy quilting!
Delete